Welcome to Teaching Students with Visual Impairments |
Optical Devices for Near ViewingBy: Carmen Willings
teachingvisuallyimpaired.com Updated November 8, 2015 Magnifiers for near viewing are used to increase the size of the image reaching the eye and can improve the visual functioning of students with most, but not all, eye disorders. Magnifiers will allow access to regular print materials both in and outside of the classroom, such as books, magazines, labels, price tags, game boards, time tables, and menus. This will prepare the student for adult life when most environmental, educational, and leisure reading materials will be available only in regular print. It is important to choose the minimum level of magnification necessary when using Low Vision Aids. This is because the power of the lens directly impacts its size as the stronger the power of a lens, the smaller the size will be. As magnifiers get stronger, the focal (or working) distance gets shorter which means you must hold the lens closer to your eye. All optical devices should be prescribed by a Low Vision Specialist who will determine the most appropriate device for the student’s unique needs.
Type of LensesConvex Lens
Convex Lens are inexpensive, lightweight and can be used on either side. They are available in powers from 1.5x to 4x. These lenses are more portable and can e helpful for spotting information such as price tags, and labels. Although these lenses are more portable, they often distort the image around the edges. These lenses are not recommended as an aid for prolonged reading activities. Bi-Aspheric Lens Bi-Aspheric lenses can be used on either side and are available in powers from 1.7x to 20x. They provide an undistorted image to edge of the lens but the user must maintain the correct focal distance for the image to remain undistorted. Single Aspheric Lens Single Aspheric lenses are used by placing the flat side on the page with the curved side toward the eye. They are available in powers from 2.5x to 15x. The student rests the lens on the page and does not need to maintain a focal distance and it provides a distortion free image from rim to rim. The drawback is that they are heavier than convex and Bi-Aspheric Lenses. Flat Field Magnifiers Flat Field Magnifiers are often called Dome Magnifiers or Bar Magnifiers. They are easy to use as it sits flat on the page and the user does not need to maintain a focal distance. Type of Magnifiers
Hand-held magnifiers
Hand held magnifiers are portable and can easily be carried in pockets, purses, and backpacks. They are relatively inexpensive and come in a range of powers. Some magnifiers provide illumination by directing light directly on the source. Some hand-held magnifiers double as stand magnifiers (they can be placed directly on the surface of the page/book) while others require the student to hold them and maintain the correct focal distance. This can be a disadvantage as the student must hold the magnifier at just the right focal distance. Additionally, if you are holding a magnifier, you “lose the use of a hand” which makes it difficult to use while trying to write. It is also difficult to use if the user has a hand tremor. These magnifiers may be used for such tasks as reading, writing, and artwork. They can be used in a variety of situations, are small, are inexpensive, and are portable. They are socially acceptable since they are familiar to most people. They are, however, less effective when high power is needed and when both hands are needed for a task. They also require good eye-hand coordination. 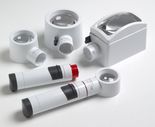
Stand Mounted & Dome Magnifiers
Stand mounted and dome magnifiers are placed directly on a page and provide a fixed distance between the lens and the object being viewed. Some have good light-gathering capacity and can be equipped with additional illumination and/or additional lenses. They are particularly helpful with students who have difficulty holding a handheld magnifier at the needed distance. The downside is that it is necessary to lean over the magnifier which can cause back and neck discomfort. Additionally, these magnifiers are typically bulkier and not as portable as hand held magnifiers 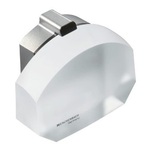
Illuminated Magnifiers
Illuminated magnifiers are beneficial for students who require high-powered devices and need supplementary lighting, or those who want to avoid reflections from ceiling lights. The magnifier puts the focus of the light on the paper creating more light and creating higher contrast. Illuminated magnifiers are available in handheld or stand magnifiers. However, they are not useable without batteries. 
Globe, Dome & Bar Magnifiers
Globe, dome, and bar magnifiers are portable and are placed directly on a page to view print. They are half-spherical magnifiers, sometimes called “bright field” because they gather light. They are not typically available in high powers of magnification so they aren't suitable for everyone. They are always in focus but must be rested on the reading surface so these are not as ideal when reading price tags or other information when it isn’t possible to rest directly on the surface. Bar Magnifier
Bar magnifiers are semi-cylindrical lenses that lie on top of a page and magnify one line of print at a time. They only come in magnification up to 1.5x so they are only helpful to users with minimal vision loss. Additionally, they can distort the print. Magnifiers on Adjustable Arms
Magnifiers with adjustable arms are designed for sighted people to perform fine detail tasks and are typically not helpful for persons with visual impairments as they have limited amounts of magnification. Pocket Magnifiers
Pocket magnifiers are lightweight and are relatively easy to use. They come in magnification ranging from 2x to 15x. Pocket Magnifiers can be helpful in the kitchen to read labels, when shopping to look at price tags, or in a restaurant to read menus. They offer a narrow field of view and a short working distance which can be a disadvantage. Spectacle Mounted Magnifier for Near Viewing
Half Eye Prismatic Spectacles are available in magnifications from 1x to 4x and are helpful to persons who need only 3x or less magnification. Hyperoculars are available in magnifications from 4x to 12x magnification. Keep in mind the higher the magnification, the closer the user would need to be to the print. The largest advantage is it allows the user to have both hands free. The disadvantage is there is a short working distance as the user has to bring the object close to the face to bring it into focus. 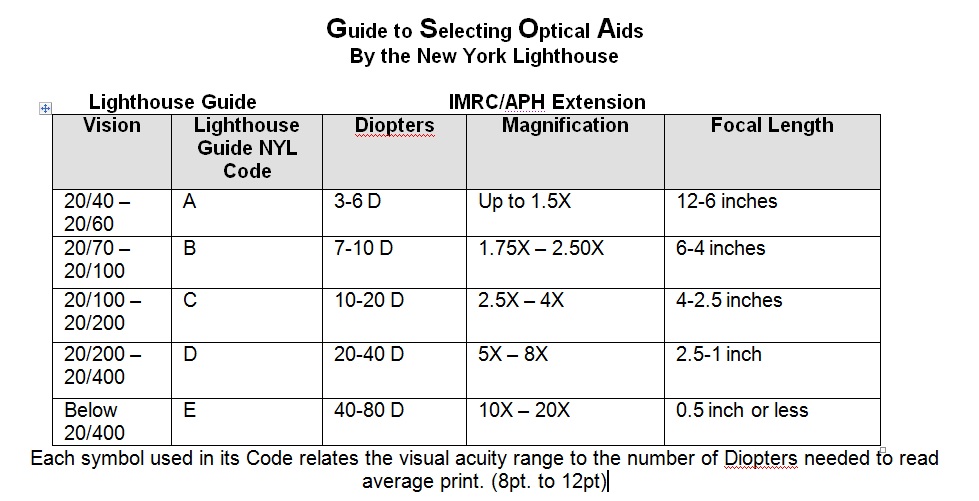
The question is not what you look at, but what you see." -Henry David Thoreau |
Sensory Efficiency SkillsAuditory Readiness
Visual Efficiency
Optical Device Use
Tactile Readiness
|
|
Teaching Students with Visual Impairments LLC
All Rights Reserved 
|