Welcome to Teaching Students with Visual Impairments |
Using the BraillewriterBy: Carmen Willings
teachingvisuallyimpaired.com Updated March 26, 2024 Students will not only need to learn to read braille but to write braille as part of their literacy program. Encourage students to write about areas of interest and practice reading back what they wrote. Writing on the braillewriter requires physical strength, in addition to fine motor skills. Students can learn to make the connection between pressing the keys and forming symbols when they "scribble" on the braillewriter. As part of the writing process, students will need to learn to insert the paper into the braille writer. Teach the student the names of the parts of the braillewriter and relate the dot positions to the braillewriter keys. Knowing the dot positions will help in instructing the student on how to form the various letters and symbols. The most common way for a student to produce braille, and fundamental for transitioning to electronic means of producing braille, is to use a standard manual braillewriter such as the Perkins braillewriter. Although the traditional Perkins braillewriter is heavy, I prefer this model to newer lightweight models as I feel it produces higher quality braille without tearing the tops of the braille when returning to the beginning of the line. In order to use the braillewriter proficiently, the student will need to learn skills to produce braille. The following is a sequence of skills that students will need to learn to produce braille on the braillewriter.
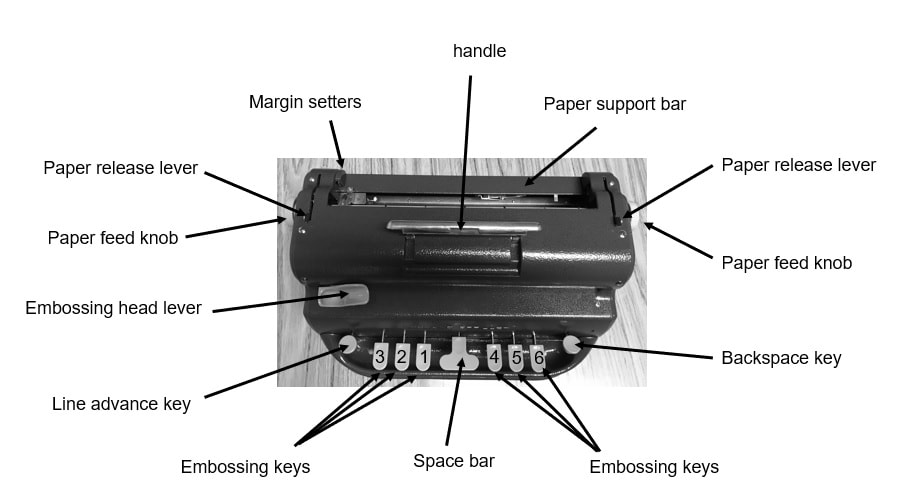
Braillewriter PartsWhen orienting the student to the braillewriter, use consistent terminology when identifying parts of the braillewriter.
Loading Paper in BraillewriterAs part of the writing process, students will need to learn to insert paper into the brailler. Teach the student the names of the parts of the braillewriter as the student learns to orient to the braillewriter and operate it independently. The following, are the steps to load paper in the braillewriter:
Writing with a BraillewriterDiscuss with students that it is important to use the correct finger on each key of the braillewriter to develop speed and fluency in writing. To form letters and symbols with braillewriter, demonstrate how you must press the embossing keys that correspond to the braille cell. Demonstrate the importance of pressing all the keys needed at once and with the same pressure to make dots that have equal heights.
Removing Braille PaperJust as it is important to teach the student the proper way to load paper into the braillewriter, the student must also learn to remove the paper independently. The following are the steps to remove a paper from the braillewriter.
ErasingLet the student know they will no doubt make mistakes as they are learning to write on the braillewriter. Discuss how a braille eraser is a wooden or plastic device used to flatten, or “erase”, braille. Although you can also rub out dots with your fingernails or another tool, a braille eraser has a rounded and firm tip that will minimize the likelihood of tearing the paper. If dots are not rubbed out smoothly, they may leave a trace that can confuse someone who is reading braille. It is helpful to attach the eraser to the side of the braillewriter with a piece of Velcro, so it is readily available and doesn’t roll away.
Skills to PracticeEncourage the student to
|
ECC InstructionTeaching Strategies
Compensatory Skills
Concept Development
Alternative Communication
Emergent Literacy
Access Print
Access Environmental Print Pre-Braille
Braille Code
Braille Formatting BraillewriterSlate & StylusTactile Graphics
Assistive Technology
VI AT Printables Basic UseProblem Solve Braille NotetakeriOS/Tablet
Windows KeystrokesWord ProcessingProductive Online VI AT Resources Social Skills
Social Skill Needs Non-Verbal Skills
Self Determination
Self Determination Skills
Sensory Efficiency
Sensory Input Sensory Areas & RoomsAuditory ReadinessVisual Efficiency Skills
Independent Living
Personal Care
Hygiene & Grooming
Shopping & Consumerism
Orientation & Mobility
Recreation & Leisure
Career & Vocational
Job Awareness
|
|
Teaching Students with Visual Impairments LLC
All Rights Reserved 
|